Although our users praised Forex Tester 4 with many pleasant words, after months of hard work behind-the-scenes, we are proud to announce the release of Forex Tester 5!
Forex Tester 5 includes all the best of the previous versions with dozens of mind-blowing new features!
See the full list of new features and improvements here
If you’re an existing client, be sure to download a new version and consider getting your upgrade here

FOREX TESTER 4!
Created to provide you with a competitive advantage in Forex trading

1. Broker’s commissions added to every trade
Now you can simulate any spread and commission your broker.
How it works 🡣
Problem:
In the case that your broker charges commission and spreads, your profit has to cover these expenses unless you cannot claim that you have won the trade. Every trader can claim he is successful and “lock the trade in profits” only if he can pay back his broker first.
Solution:
Our main aim is to make backtesting as close to the real-life conditions and imitate market as much as we can, it was hence necessary to implement a broker’s commission into the calculations, so not you are able to make your calculations precise.
How does this feature work?
In the case you are aware of the commissions’ rules of your broker, you follow the path above and fill the meaning of the commission.
Please note that it is necessary to know either your broker charges the commission when you open the trade when you close the trade or both ways.
How is the broker’s commission calculated in Forex Tester 4?
The formula of the calculations is the next:
Commission (the value the trader fill)/1 lot * Volume Traded
*Please note that 1 lot value is 100.000$.
Let’s say your broker charges $5 commission per 1 lot and you want to trade 0.5 lot.
In this case, the commission will the:
5/100.000*50.000=2,5$
Take into account that if your broker takes the “round tour” commission, you will be charged 2.5 when you open your trade and the same amount when you close it.
When the trade will be closed, your profit will be displayed in the account history, less the broker’s commission value.
This way, your trading results correspond as closely as possible to the actual reality of the live trading.

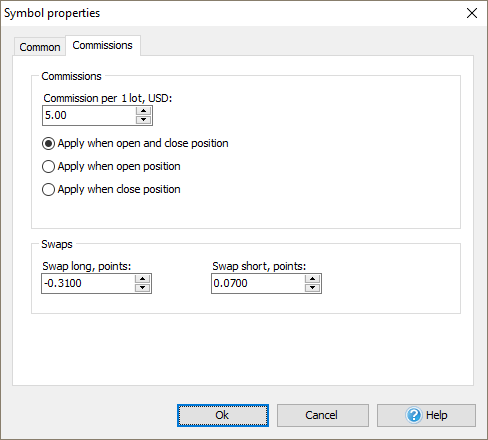
Location
- “Data Center” → “Change properties” → “Commissions”
- Fill the meaning for the commission per lot and choose either the program should apply when open and close or only one of the options according to the rules of your broker.
- Check for the commission meaning in the Account history next to the Profit column.
Value
With the help of this feature you get the full picture of your trading: more detailed, more precise and enable a more rigorous analysis of your trading decisions.
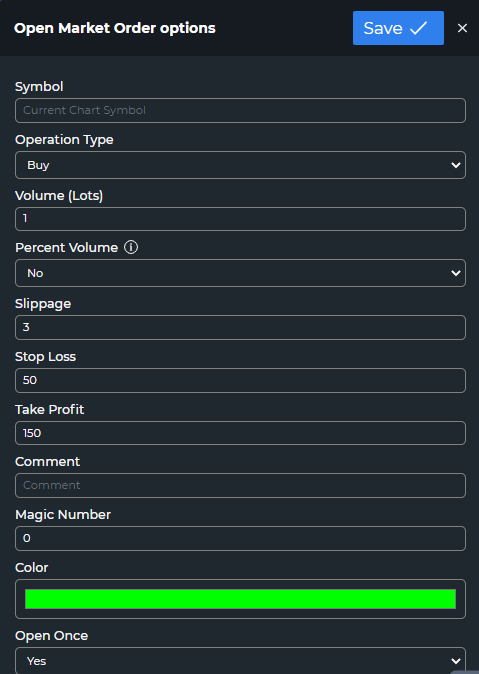
2. Risks calculations
With Forex Tester 4, you don’t need to calculate a secure lot size by yourself. The program will do it for you in 1 click!
How it works 🡣
Problem:
Money management is one of the basic pillars of reasonable and successful trading. Probably every trader knows the “2% rule” with its variations – one of the golden rules of the money management – according to this rule, you should risk no more than 2% of your account size.
However, it is hard to calculate the size of your lot every time you want to enter the trade. Isn’t it great when the program performs all the calculations on its own?
Solution:
With this feature, it is possible not to bother yourself with the calculations: now you have two options – fill the lot yourself or apply the risk management feature and the Forex Tester 4 will calculate the lot value for you.
Lot value will be calculated based on current equity, risk percent, stop loss and point value:
Lot value = Equity * Percentage of risk / (Stop-Loss in points * Point value)
For example, you do not want to risk more than 2% from your 10,000 equity for this trade. And you want to have stop-loss 100 points, and your point value is $1 for 1.00 lot.
Lot value = 10.000 * 0.02 / (100 * 1) = 2.00
As a result, you can use lot 2.00 for this trade.
This way, even the single loss trade won’t be drawn your account, so if you need to you will be able to recover your account with the additional successful trades.
Location
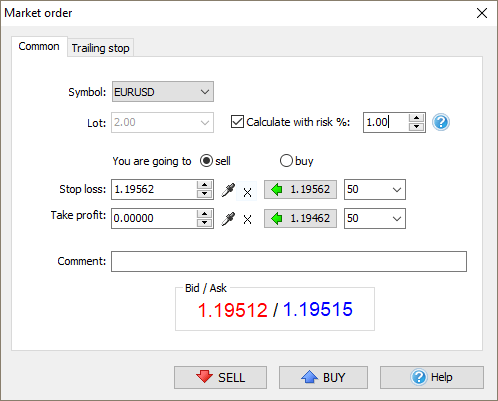
- At the “Market order” window, you can find the field where you can fill the level of the risk.
- Please note that it is necessary to fill the Stop Loss meaning as well: you won’t be able to open the order without the Stop Loss meaning being filled.
- Based on the risk meaning and the value of the Stop Loss, the program automatically calculates the lot value affordable for this trade.
Value
Manage your trades wisely according to the crucial principles of money management – save your nerves and money. Implementing this feature while backtesting in Forex Tester 4 will be an excellent practice on how to trade with the firm money management rules in live trading.
3. Crosshair upgrade
In Forex Tester 4, the work of this tool was greatly improved. Now you can learn more data with its help!
How it works 🡣
Problem:
We used to have the measurement tool that could be enabled with the help of crosshair, however, we have tried to make it more illustrative.
In the older version of the Forex Tester, you could check only the range of the bars, the quantity of the points and the price at the final point. It sounds great, but a bit more info can make the analysis more accurate.
Solution:
We have updated and widen the notification you see when you use the Crosshair measurement tool.
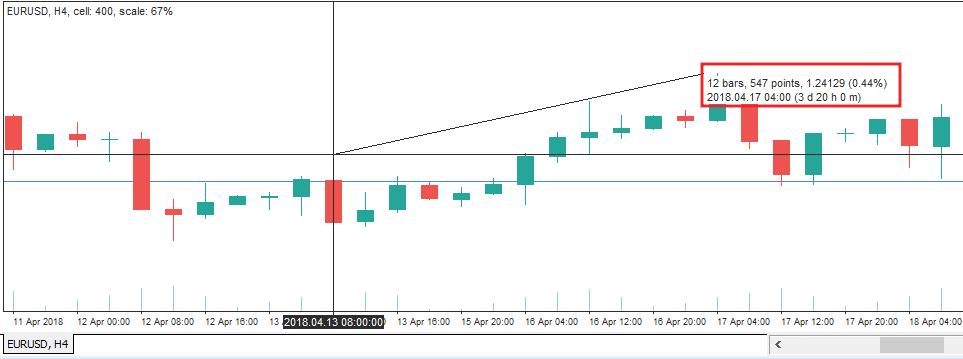
New function of the crosshair measurement tool answers the next trader’s questions:
- What is the distance between the two candles in bars points?
- What is the price value at the final point and how has the price changed in % value?
- What is the date/time of the final candle and how long will it take the price to get to that point?
All the mentioned above values are illustrated near the crosshair sign in two rows.
Location
- Enable the crosshair cursor at the Paint toolbar
 - press with the left button of the
mouse at the chart → drag the mouse to the area you want to measure and use the
crosshair as the advanced ruler.
- press with the left button of the
mouse at the chart → drag the mouse to the area you want to measure and use the
crosshair as the advanced ruler.
Value
Making the trading calculations and predictions process requires the maximum concentration and a measurement tool like this can help you to ease the chart analysis at times.
Check how to measure the length of the trend, learn how much the price has dropped or raised in a simple click.
Fundamental News
[A tool for fundamental trading is already in Forex Tester 4!]
Are you fond of the fundamental analysis? Or you prefer a technical analysis but still watch out for some news which affects the market?
Then you will definitely find the next feature valuable – we included Historical news service to Forex Tester 4!
Now you can check how significant political and economic events affect the Forex market.
How it works 🡣
Problem:
In Forex Tester 3, we provided our users with an extensive list of tools for technical analysis. However, those traders who use fundamentals as an additional source of information in their forecasts lacked the appropriate tools to make their backtesting results as close to reality as possible.
Solution:
In Forex Tester 4, we have solved this problem by adding Historical news service.
Why this feature is so important when it comes to improving your backtesting process?
Its significance is based on the great impact that the major economic and political events have on the market moves.
We have launched a news service for those traders who are eager to find the reasons for such huge market moves and adjust their trading decisions accordingly.
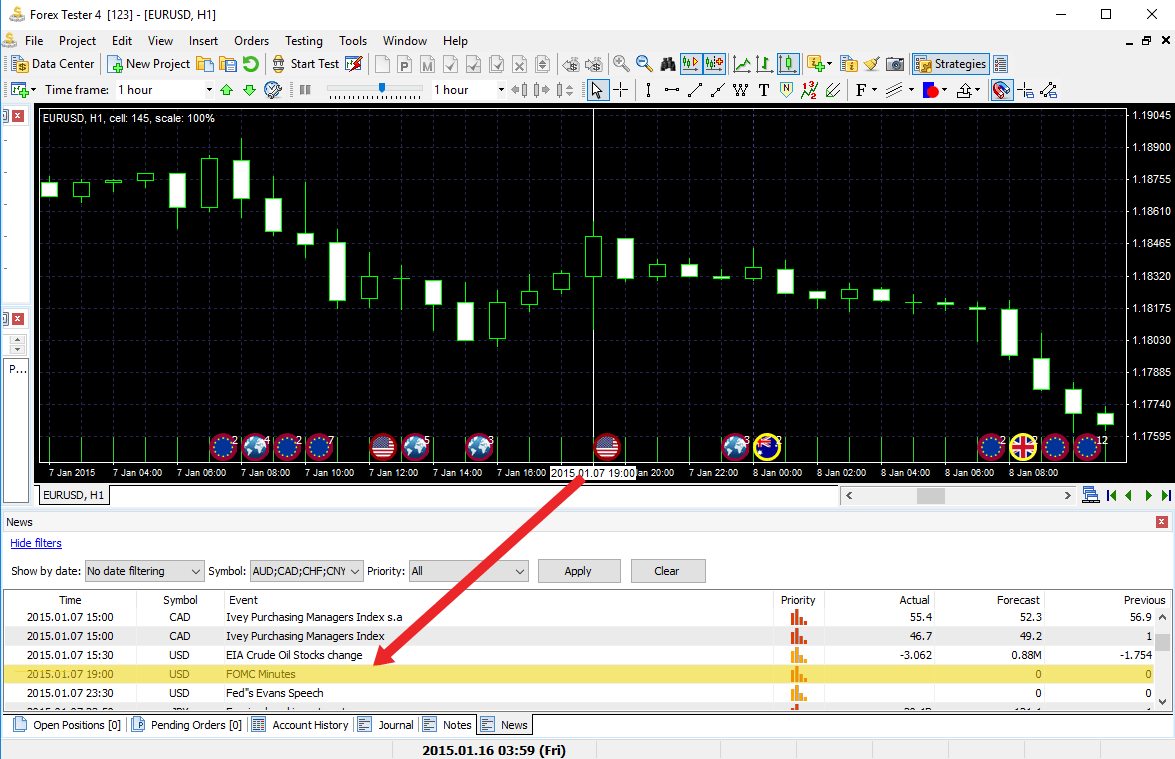
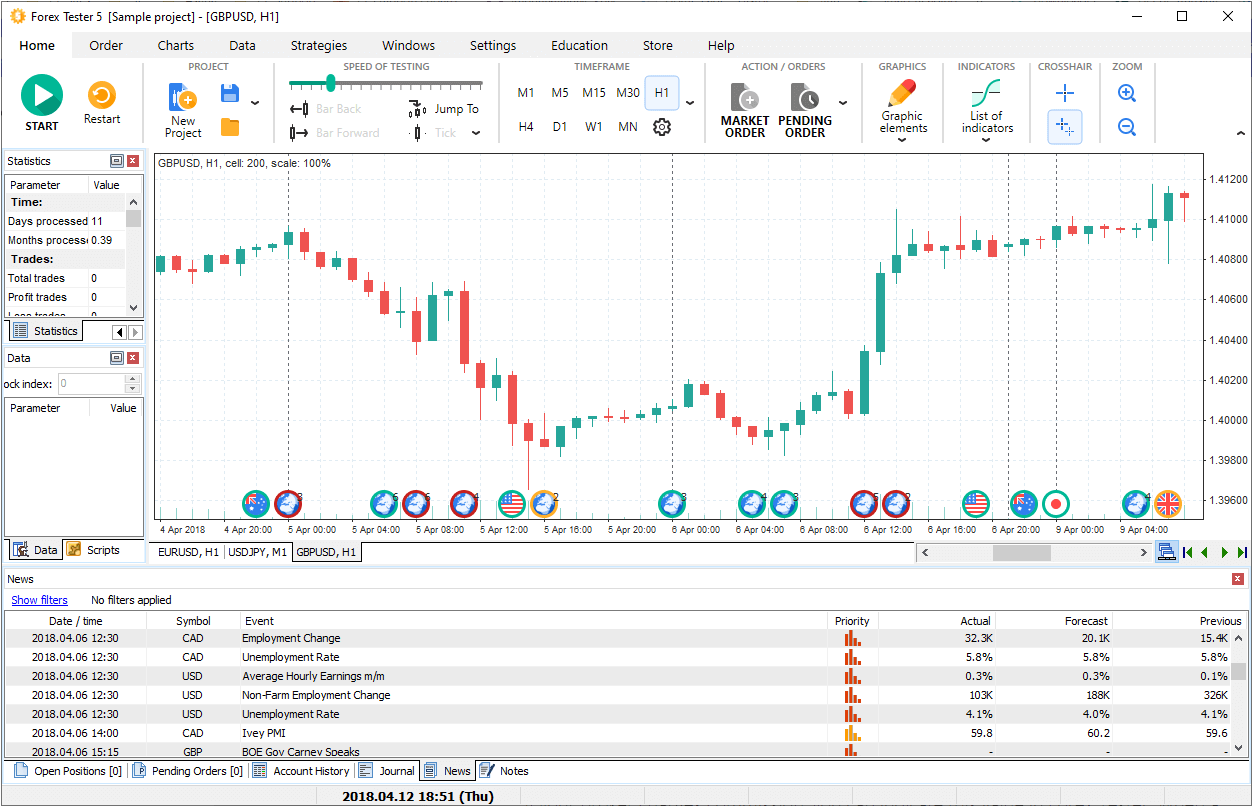
In Forex Tester 4, Historical news service is represented as a table with the following meanings:
- Date/Time: date and time of the news release
- Symbol: the symbol to which this news relates
- Event: the event itself is described
- Priority: the priority of the event is expressed by a sign and shows the level of importance of the news
- Actual: the actual impact of the news on the financial situation
- Forecast: shows the forecast of the financial experts for the event
- Previous: shows the previously available forecast of the financial experts for the same event
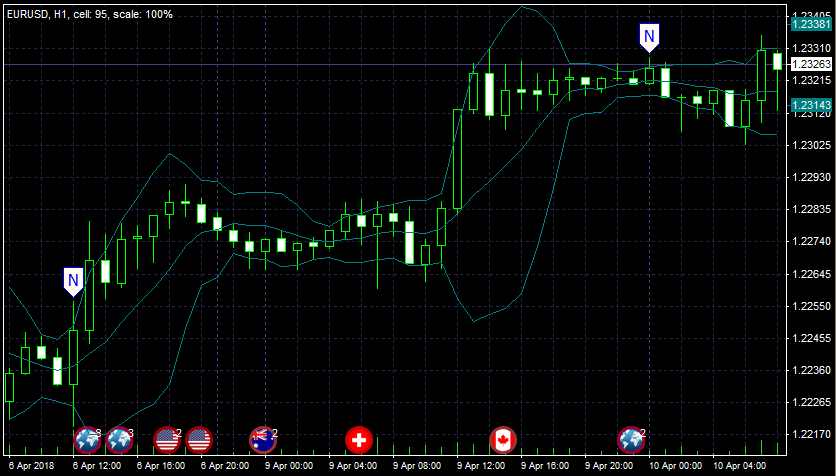
Additionally, news notifications will appear on the chart tied to the candle they correspond to.
You can find news represented as the flags corresponding to the country they belong to at the bottom of the chart.
The color of each news is a good hint for you to predict the market moves and plan your strategy accordingly:
- Green color: it is unlikely that the market will make huge moves
- Yellow color: the news will most likely provoke slightly significant market moves
- Red color: get ready for powerful moves and make sure your trade is a weighted decision
These colors are represented as the colored borders around the corresponding icon. The meaning of Priority (at the News tab) can give you the hint at the importance of the news as well. In case, if much news happens at the same time, you will be notified with the Globe icon.
You don’t need to limit yourself to the technical analysis only! Predict the major market moves based on the fundamental events with the help of our Historical news service and then make use of the technical analysis tools to define the entry and exit points.
Location: You can find news represented as the flags corresponding to the country they belong to at the bottom of the chart and you can find the economic calendar as the additional tab next to “Account history tab”.
More symbols: stock, indexes, cryptocurrencies
[Make use of 800+ new symbols included]
| Forex Tester (without paid data subscription) | Forex Tester 2/3 (with paid data subcription) | Forex Tester 4/5 (with paid data subcription) | ||
|---|---|---|---|---|
| Number of symbols | 18 | 118 | 818/860 | |
| Historical News | For 9 main currencies | |||
| Categories | ||||
| Majors | 7 | 7 | ||
| Crosses | 26 | 29 | ||
| Commodities | 10 | 22 | ||
| Metals | 13 | 16/20 | ||
| Exotic | 34 | 60/95 | ||
| Indexes | 20 | 111 | ||
| Stocks | 8 | 568 | ||
| Futures | 2 | |||
| Cryptocurrencies | 4/6 | |||
Do you trade stocks or indexes? Or the cryptocurrency is in the field of your interest? Meet the updated historical data service that can definitely meet the needs of the demanding trader!
We added more than 800 various symbols to the historical service packages: stocks and indexes, cryptocurrencies and futures. Commodities, crosses and exotic pairs sections were extended as well.
Enjoy a great possibility to test a wider variety of symbols in Forex Tester 4!
Easy Forex Builder (EFB) [Create an EA in a couple of clicks!]
Now you do not have to be a programmer to create an EA! Seriously, you can now create EAs with a simple drag-and-drop.
The main task of this program is to give a possibility for every trader, without reference to their coding skills or trading experience, to create an expert advisor that would match their personal preferences; modify and refine as much as the trader needs.
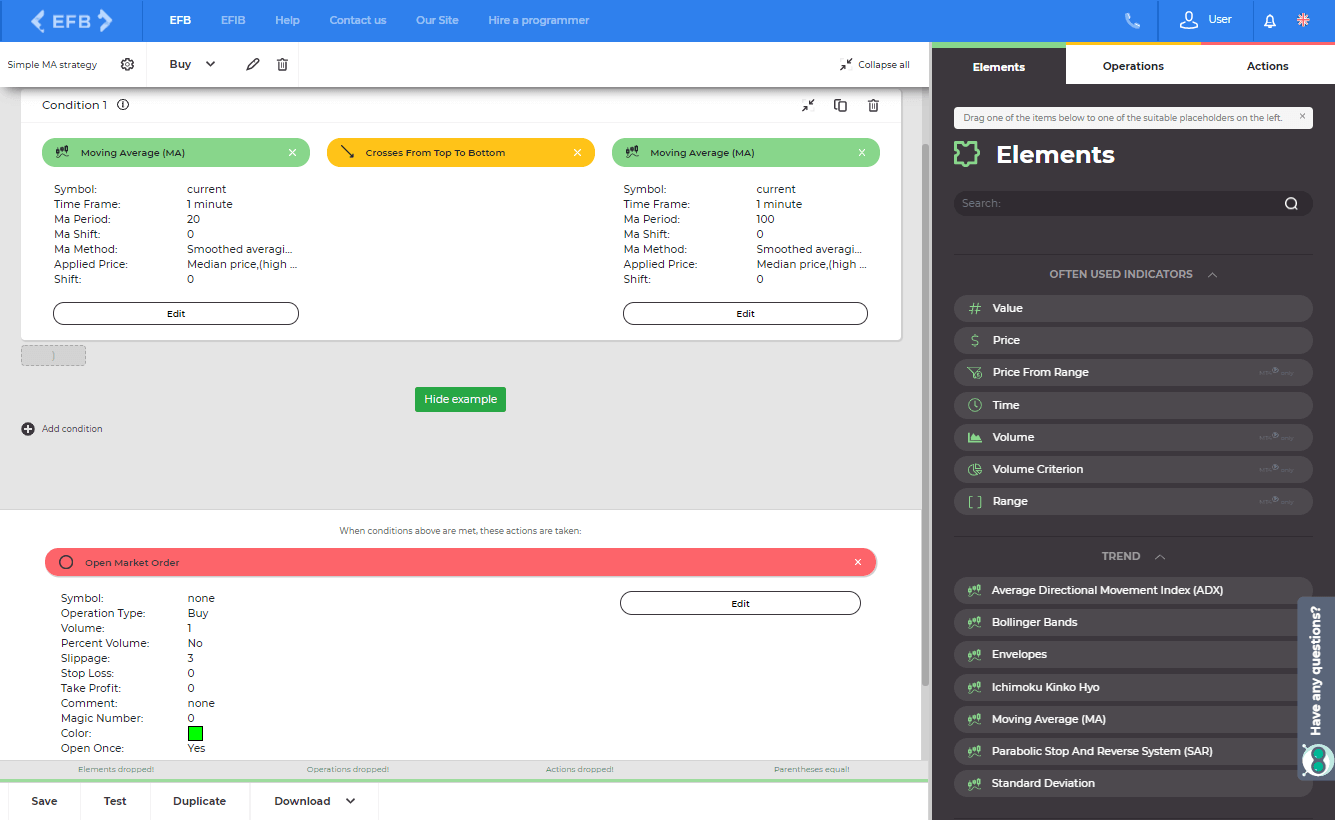
The idea is quite simple: you just drag and drop the needed elements and receive a coded expert advisor.
To begin with, let’s have a look at the main advantages of Easy Forex Builder and find out how to create an expert advisor (EA).
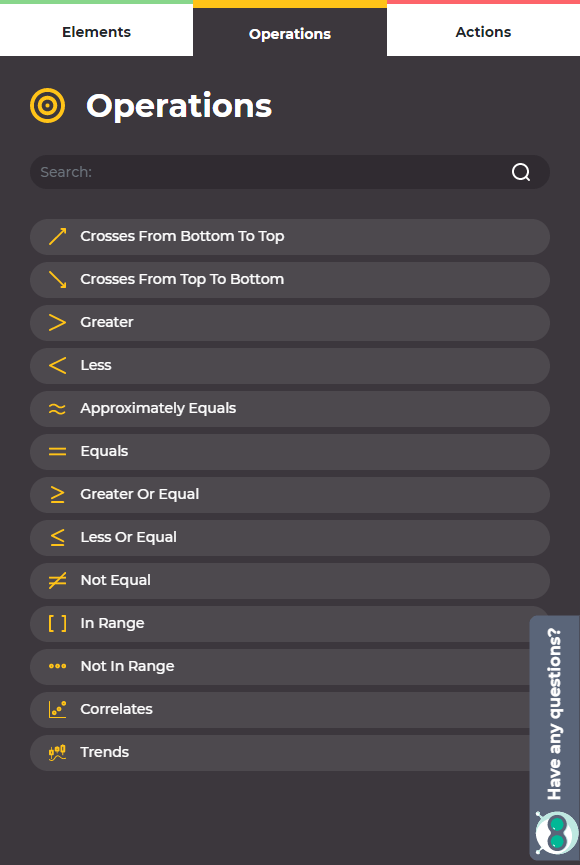
Here are top features of Easy Forex Builder we are proud of:
- Drag & drop interface
- 4 types of objects to combine: Indicators, Value, Price and Time
- 8 operations to follow (crosses from bottom to top or from to bottom, more, less or equals)
- The variety of actions the EA should take
- Unlimited number of conditions to combine inside one strategy
- Unlimited number of EAs you can create
- Comprehensive rules of the strategies building
How to work in this program? Everything is simple!
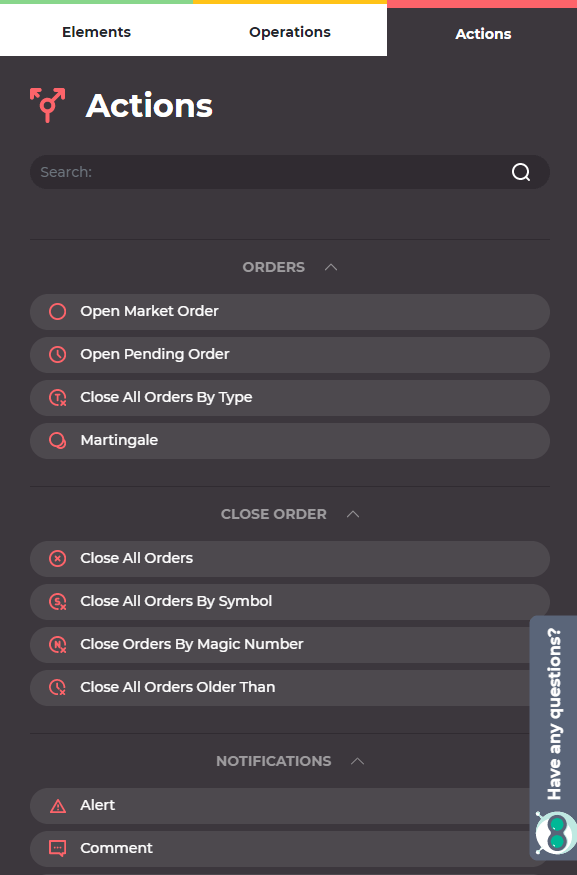
- Choose between elements of your strategy - Indicators, Value, Price and Time.
- Edit settings for each element.
- Set the operations that alert the expert advisor to perform any of the actions (for example, the crossover of two Moving Averages).
- Choose the actions that the expert advisor should perform (open buy/sell orders; open buy/sell limit orders; open buy/sell stop orders; close position; modify order etc.).
- Export your file: once you are done, you can export the expert advisor.
Location: easyforexbuilder.com
Value: Try out any version of Easy Forex Builder and you will see that there is nothing difficult! Create your perfect trading system without the necessity to pay someone else!
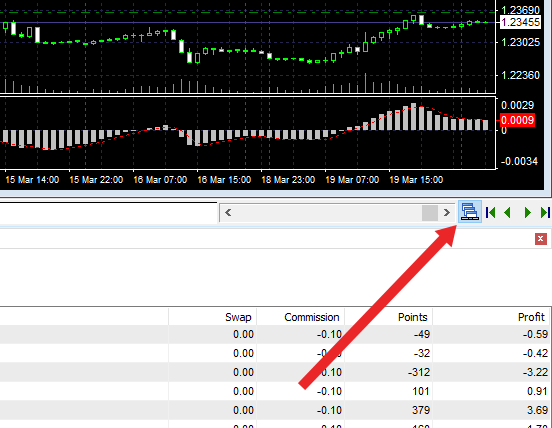
1. Mode of displaying history in points [Now your points are calculated automatically]
In Forex Tester 4, your Profit/Loss value is represented in both points and money equivalent. As a result, you can instantly check the total number of points you won or lost.
How it works 🡣
Problem:
In Forex Tester 3, traders could see their trading results represented only in money equivalent. If they needed to know this value in points, they had to calculate it by themselves.
Location
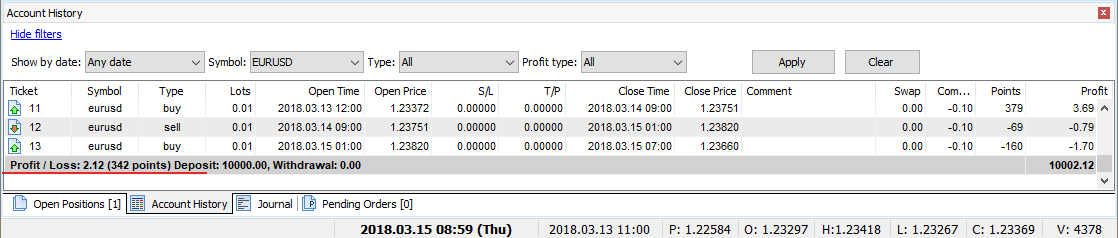
The number of points can be found in the “Account History” menu (under your chart) just to the right of the money equivalent of the Profit/Loss value.
Value
A better understanding of the trading results.
2. Filters for Account history [More detailed analysis of your trades]
Now, you can easily filter the orders in the Account History menu! Simplify the analysis of your trades by grouping them according to parameters such as Date, Symbol, Type, and Profit.
How it works 🡣
Problem:
In Forex Tester 3, there was no actual possibility to filter the orders by currency, open and close time, type, and other parameters which would make your work more effective.Solution:
In the new version of Forex Tester, you can enjoy a great feature of filtering orders in the Account History menu (click “Show filters”). Simplify analysis of your trades by grouping them according to such parameters as:
- Date (Any date; Open date; Close date; Open or Close date; Open and Close date)
- Symbol (a dropdown menu with all currency pairs involved in the project)
- Type (All; Buy; Sell; Deposit; Withdrawal)
- Profit (All; Profit; Loss)
Location
To filter your orders, please go to the “Account history” menu under the chart → choose the “Show filters” option. In the open tab, you will see the parameters by which your orders can be categorized.
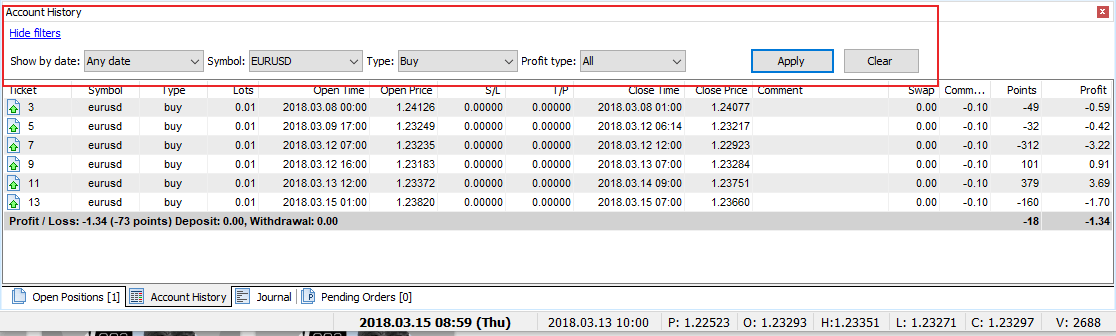
Use the “Apply” and “Clear” buttons to work with the filters.
Depending on whether you have already applied some filters or not, you will see a corresponding note on the panel of filters (if it is minimized).
Value
An easy way to see your trading results in a well-structured form.
3. Export of the Profit chart to Excel [One more way to export your data]
Also, now you can Export the Profit chart to Excel for further analysis.
How it works 🡣
Problem:
In Forex Tester 3, you could only export your History and Statistics to Excel or to a file.
Solution:
In the new version of Forex Tester, the feature of data exporting was significantly improved. Now you can also export the Profit chart to Excel or to a file. The exported file will consist of 8 columns:
- DateTime
- Equity open
- Equity high
- Equity low
- Equity close
- Balance
- Margin
- Drawdown
Location

The process of exporting your Profit chart is very simple:
Right-click on the Profit chart → choose the option you prefer in the open context menu (Export Equity to a File; Export Equity to Excel).
Value
Get access to all of your data whenever you want it.
1. Global Crosshair Cursor [More productive use of the Crosshair pointer]
FT4 users can synchronize crosshair on all charts. When pointing on the selected chart with the Crosshair cursor, it is also represented on the rest of the charts.
How it works 🡣
Problem:
In Forex Tester 3, when you had several charts open, you could use Crosshair pointer only on one of these charts. To use it on another chart, you had to click on this particular chart and then choose Crosshair pointer again.
Solution:
While working with several charts, FT4 users can synchronize crosshair on all of them. When pointing on the selected chart with the Crosshair cursor, it is also represented on the rest of the charts with all the time frame differences intact.
Location:
To enable/disable Global Cross Hair Cursor, click the button situated next to the Magnet mode on the toolbar . Then use the Crosshair cursor as always.
Value:
Save your time by analyzing all the charts simultaneously.
2. Simultaneous scrolling of the charts [Match the data on different time frames 10 times faster]
All charts with the same currency pair can be synchronized in Forex Tester 4.
How it works 🡣
Problem:
There are two open charts with the same currency pair but different time frames. It is difficult to find relevance between candles on different time frames. Let’s say it is June 25 (17:00) on the first chart, and June 27 (20:00) on the second chart. In Forex Tester 3, you had to find the candle that corresponded to the same data on both charts manually (you needed to estimate the time and match the data).
Solution:
In Forex Tester 4, all charts with the same currency pair are synchronized, and while scrolling within the same time frame, all other charts will be scrolled automatically with the right calculation. For example, while scrolling 1 bar forward on the H1 time frame, the M5 time frame chart will be scrolled 12 bars forward respectively.
Location:
- Enable the “Synchronize scrolling of all charts”
- Right-click on the chart and go to the “Chart Settings → All Charts” menu
- Select the option you need in the “Charts’ Synchronization Align Type” section
Value:
Time economy, convenience, possibility to make trading decisions faster.
3. All linear tools synchronized on all charts [Copy a required tool without any effort!]
In Forex Tester 4, you can easily duplicate graphical tools to other chart windows of the same currency pair.
Save your time and effort with the function of duplicating graphic tools!
How it works 🡣
Problem:
In Forex Tester 3, traders had no possibility to synchronize graphical tools on the different charts with the same currency pair selected. After adding a graphical tool, it was only represented on one particular chart.
Solution:
In the new version of Forex Tester, you can easily duplicate graphical tools to other chart windows with the same currency pair. For example, you can add a trend line to one chart and then it will appear on all of your charts.
Similarly, graphical tools created on different charts (with the same currency pair) are connected. If you delete one, other tools related to it will be also removed from the rest of the charts.
Location:

To activate synchronization of all linear tools, just click the last button on the Paint toolbar.
Value:
Enjoy the automated process of copying graphical tools.
1. Enable the “Forward testing only” mode [Approximate your testing process to the real trading!]
It is a mode that doesn’t allow you to step back by one bar – everything is like the real trading. This may work as an “exam” for the strategy which you have developed.
How it works 🡣
Problem:
In Forex Tester 3, there was only one, “ordinary” mode of testing a project. While backtesting, you could always step back by one bar and change your trading decision. There is nothing bad in it, of course. On the contrary, the possibility of “going back” is very helpful when it comes to seeing the differences that various trading decisions can cause. But there is also some “cheating” moments in it.
Solution:
In Forex Tester 4, you can choose between 2 testing modes! Change them whenever you want and combine both variants for improving your trading skills.
Also, you shouldn’t be afraid of mixing up these two modes. When trying to step back by one bar (or clicking Backspace) in the “Forward testing only” mode, you will receive a notification telling you that this mode is chosen in the current moment. You can select the variant not to show you this message in future.
Moreover, in the program name window, you will see the “forward only” note added to the name of your project: Forex Tester 4 [Your project name] - forward only.
Location:
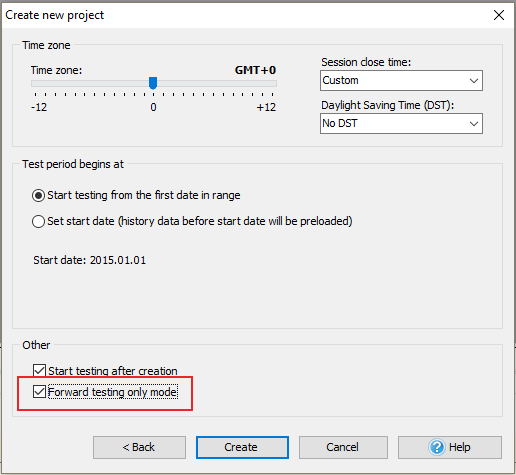
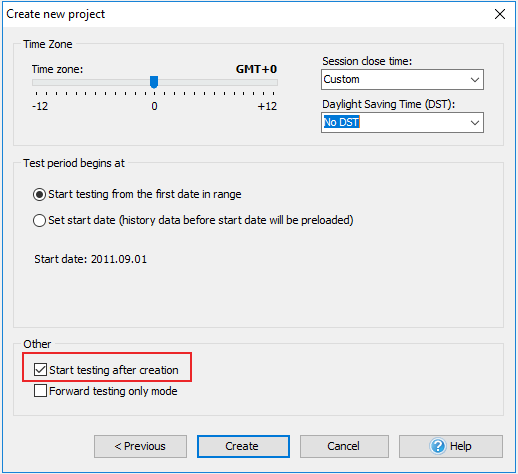
- You can enable the “Forward testing only” mode when creating a new project.
- In the last window, find the “Other” section → select the “Forward testing only mode” option.
- To disable this mode, restart your project and uncheck the “Forward testing only mode” option.
Value:
A faster learning process and the most realistic trading results.
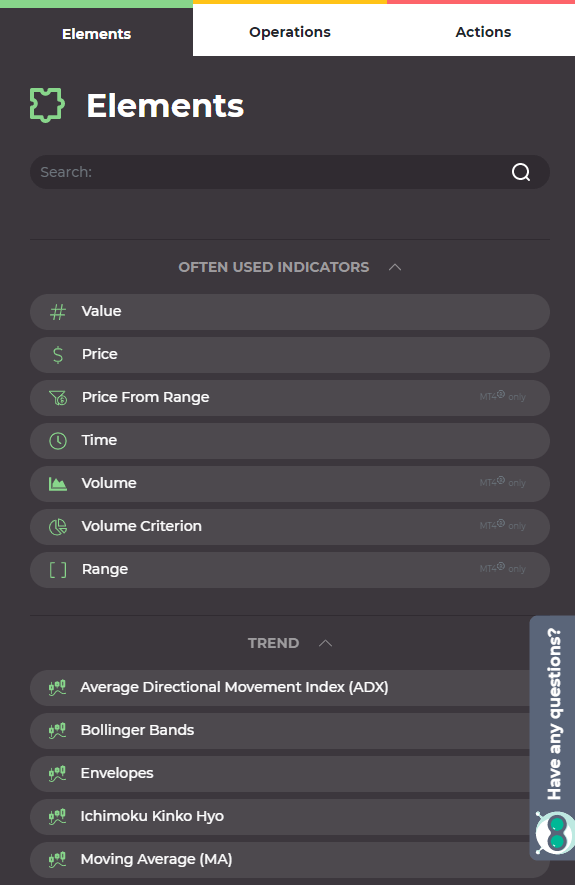
2. Indicators classified according to their functions [It has never been so easy to find the indicator you need!]
Indicators are now classified according to their functions - now it is even easier to access your favorite indicators!
How it works 🡣
Problem:
When adding indicators in Forex Tester 3, it was a bit difficult to find the one you need among a great variety of other indicators. Users had to look through a long list in order to find a desired one.
Solution:
In Forex Tester 4, we grouped all indicators by their functions, so that you can find the necessary one in less time. There are the following groups of indicators:
- Trend indicators
- Oscillators
- Volume indicators
- Volatility indicators
- Adaptive indicators
- Custom indicators
Location:
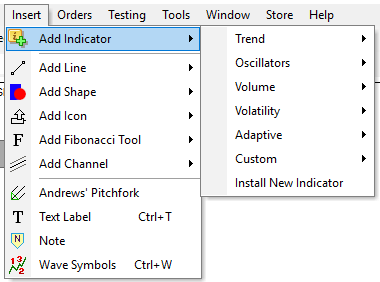
- To add an indicator, please go to the “Insert → Add indicator” menu.
- You will see 6 groups of indicators. If you point to a particular group with a mouse, the full list of indicators belonging to this group will be displayed.
Value:
It is a time-saving feature for you and more structured interface for the program!
3. Notification while closing a window and/or deleting objects [All your objects are in safety now!]
The Forex Tester experience has become a little safer. You won’t accidentally delete all your objects on a chart or accidentally close a window with valuable objects on it.
How it works 🡣
Problem:
In Forex Tester 3, users could face the following problems:
- After they pressed the Ctrl + A combination, all objects were removed from the chart.
- They closed the chart window by mistake, and when they opened this chart again, there were no objects shown on it.
Solution:
In the new version of Forex Tester, users will see warning notifications in both cases telling them that they are about to delete all objects from the chart without further restoration.
Location:
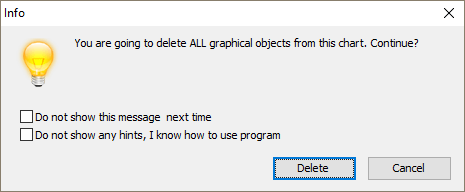
A notification window will appear when pressing Ctrl + A or closing a chart window.
Value:
Your work will never be carried out in vain!
4. “Start testing after creation” checkbox [Initiate your test right in the project creating form]
You don’t even need to click the Start Test button separately after creating a new project. Create a new project and start testing right away!
How it works 🡣
Problem:
After creating a new project and generating ticks, Forex Tester 3 users saw a black screen with the “No data” message. Perhaps, this message could make you worry that you’ve done something wrong. To start testing your project, you need to click the "Start Test" button on the toolbar.
Solution:
In the new Forex Tester version, you don’t even need to click the Start Test button separately after creating a new project. You can start your test right in the last window of the project creating form.
Location:
- As always, create a new project via the New Project button on the toolbar or via the “Project New Project”/ “File → New Project” menu.
- Enter the project name, selecting the initial deposit, currency pair, testing period, and other settings.
- In the last window used for creating a project, find the “Other” section → and choose the “Start testing after creation” option.
Value:
The faster and simpler process of testing a new project.
5. Downloading new data to an existing project [Add new data and continue your test!]
Do you want to include more data into your project? Now in FT4, you can easily download more new data to an existing project.
How it works 🡣
Problem:
Let’s imagine the next situation: you created a project with a two-year testing period, but later, in the testing process, you decided that it would be great to test this project on the data of one more year. In other words, you need to add new data to the project you are testing at the moment. In Forex Tester 3, you can’t do it. Alas, if you want to add new data, you could only create a new project with this data.
Solution:
In Forex Tester 4, however, it became so easy to do this task. Simply download new data to the project you are testing, then wait until all the ticks are generated and continue your test. You don’t even need to reload your project!
Location:
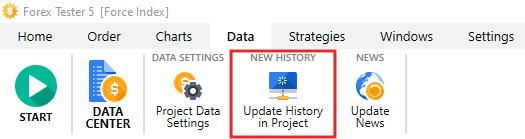
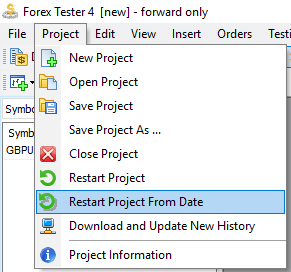
To download new data to an already existing project, please go to the “Project” menu → choose the “Download and Update New history” option.
Value:
Greater convenience and effectiveness of your work.
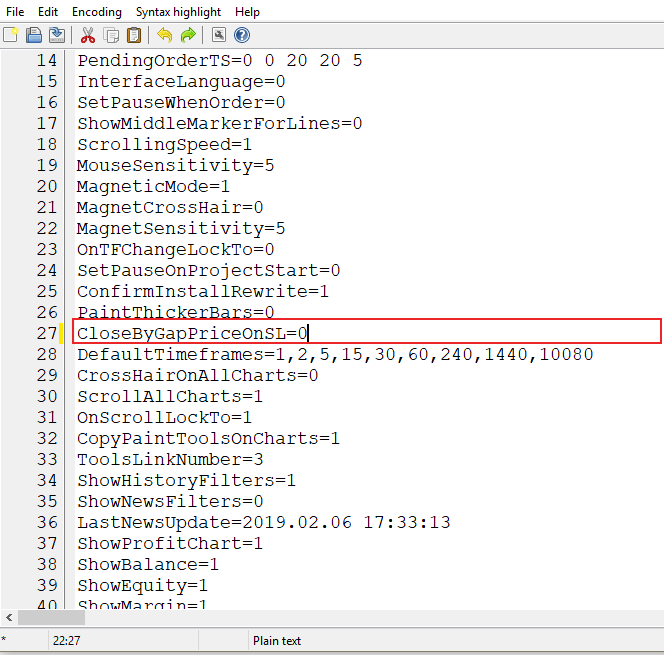
6. Closing an order at the first price after the gap [Choose between 2 variants of closing an order]
In Forex Tester 4, an order is closed at the first price after the gap by default, providing you with more realistic testing results.
How it works 🡣
Problem:
In Forex Tester 3, an order can be closed only at the Stop Loss price during the gap. It could somehow differ from the real market conditions (for example, when after the weekends, the market opens at the price that is lower than your Stop Loss) and lead to the little inaccuracies in the testing results.
Solution:
In Forex Tester 4, an order is closed at the first price after the gap by default. However, you can always return to the previous version of closing an order (check Location).
Location:
You can disable the mode of closing an order at the first price after the gap (default mode in FT4) this way:
- Go to the “ForexTester4” folder on your computer open the “options.dat” file using Notepad → find the “CloseByGapPriceOnSL=1” line → change 1 to 0.
- Now your orders will be closed at the Stop Loss price.
Value:
More realistic testing results and the possibility to choose the variant of closing order by oneself.
7. Notification when downloading a saved desktop [You won’t lose all your settings by mistake!]
Notifications when downloading a saved desktop - this small reminder will help you to prevent the accidental loss of the work you have already done!
How it works 🡣
Problem:
If you have saved the desktop with a particular currency pair, you cannot apply it in a new project with a different currency pair selected. In Forex Tester 3, there was no notification about why this desktop could not be applied to your project.
Solution:
In Forex Tester 4, you will receive a notification telling you that the desktop can be applied only to the currency pair it was initially saved for. You can also choose the variant not to show you this message in future. Moreover, this notification will help you to prevent the accidental loss of the work you have already done.
Location:
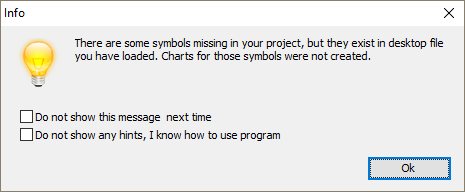
The notification window will appear while trying to apply a desktop saved for a particular currency pair to the project with another currency pair selected.
Value:
It is a useful reminder made for your work to be more convenient.
8. Saving a custom time frame for all projects [Manage your own time frames easily!]
Love custom timeframes? Now you can create a custom timeframe like M2 and use it in all projects.
How it works 🡣
Problem:
In Forex Tester 3, traders who use custom time frames needed to create them from the very beginning in every new project. It was quite inconvenient to repeat this action time after time.
Solution:
In Forex Tester 4, the process of adding a custom time frame became much easier. You don’t need to create it for every new project anymore – just do it one time and save your new list of time frames as a default list. When creating a new project, your custom time frame will be also represented among other default time frames.
Location:
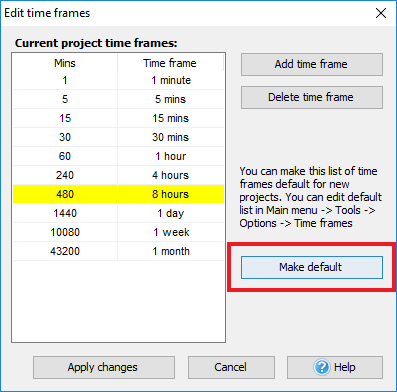
- You can add a custom time frame in the Edit Time Frames window (find it on the toolbar)
 . In the same window, you can make this list of time frames default for your new projects.
 - You can also edit the list of default time frames via “Main menu → Tools → Options → Time Frames”.
Value:
Save your own time frames – save your working time!
9. Checking the required amount of data for a project [Control your testing process better!]
Now, you can check whether you have enough data for all the symbols selected for a new project. If the data is not enough, you can download it or choose another option.
How it works 🡣
Problem:
If you wanted to create a project with several currency pairs in Forex Tester 3, and there was no sufficient data for one of these pairs for a needed period, you couldn’t start your test from the selected date for this currency pair. The program showed you the “No data” message and it could be confusing.
Solution:
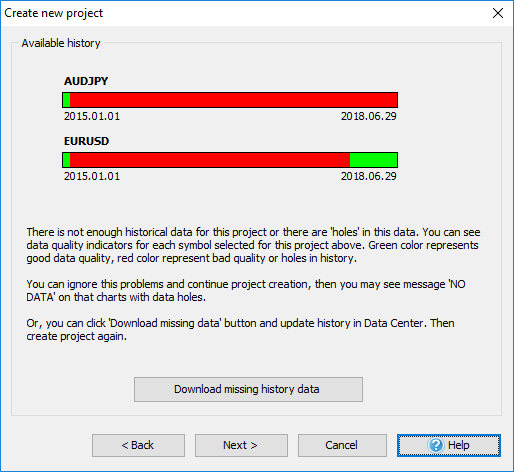
In Forex Tester 4, you can check whether you have enough data for all the symbols selected for a new project. If the data is not enough, you can select one of the options that seems the best.
Location:
To check whether you have enough data for your test, please go to New Project enter the necessary information select the currency pair(s) you want to test click “Next”.
After this, you will see a progress bar of the history testing, as well as the next message: “Checking available history…OK”
- If you have enough history, you will be redirected to the next page so you can select the parameters for your project.
- In case your history is not enough, you will see the quality of the history you have for all the symbols selected with detailed explanations. After this, you will have 2 options: download the missing history or just ignore this option and click the “Next” button to go to the next page.
If you decide to download the needed history, you will be redirected to Data Center where all the currency pairs of your project are already chosen. Then, after connecting to the server, a new window will be opened with the already selected starting and ending dates for downloading the history. You just need to click the “Update” button.
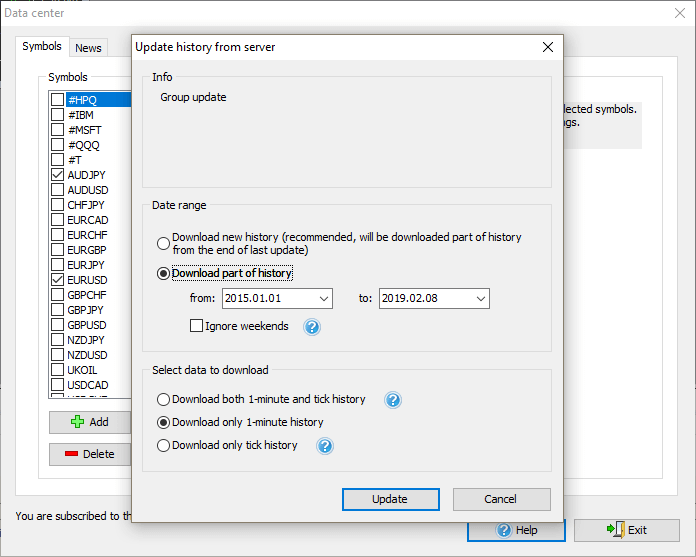
If there is no connection with the server, you will see a message telling that you cannot connect to it because of the offline mode.
Value:
Be sure that you get the fullest testing results!
1. “Apply Daylight Saving Time” checkbox [Summertime is already taken into account!]
Does your trading strategy depend on the specific time of day? Does daylight savings time make you mad? Yeah, we know that it can be frustrating to monitor all that time changes, but we have got you covered. Just use the “Apply Daylight Saving Time” checkbox
How it works 🡣
Problem:
In the Forex Tester 3 program, there is no function that would activate the daylight savings time. Subsequently, those traders whose strategies are connected with trading sessions that require considering summertime need to calculate this time difference by themselves. In the case that their calculations are wrong, it can lead to inaccurate results.
Solution:
In Forex Tester 4, you can activate the “Daylight Saving Time” option. The principle is as follows: to those bars that are situated within the period from the second Sunday of March to the first Saturday of November, one hour is added in order to move the data to summer time.
Location
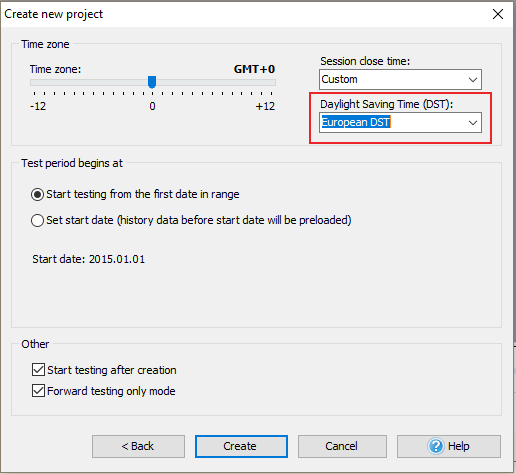
You can find the “Apply Daylight Saving Time” checkbox in the last window of creating a project in the “Time zone” section.
Value:
Automated calculation of the time shifting for a trading session you are interested in.
2. Custom time settings [Enjoy the simplicity of selecting a time zone!]
Do you trade in a time zone other than the London session? Do you want to see “New York Close” charts or “Tokyo Close” charts? No problem! Now you can easily choose your time zone and select one of your trading sessions.
How it works 🡣
Problem:
When selecting time settings for a new project in Forex Tester 3, you had to calculate the difference between various time zones by yourself. It could be somehow inconvenient.
Solution:
In Forex Tester 4, all the calculations are already made for you! All you need is to choose a desirable time zone. In the project creating a form, we added a drop-down box with 2 blocks:
In the first one, you can choose between 4 trading sessions:
- Sydney Close
- Tokyo Close
- London Close
- New York Close
The second block is created for individual time zones.
Location
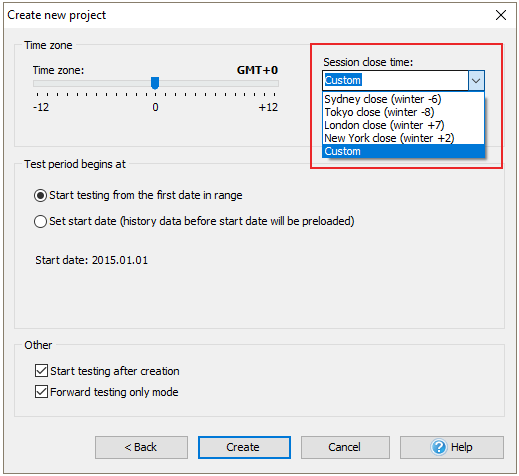
To adjust your time settings, please go to New Project → “Time zone” section (the last window of the project creating form) → and select the time zone you require.
Value:
The easier process of adjusting time settings.
3. Restart a project from the date you need without creating a new one [Save your precious time!]
You can also restart a project from the date you need without creating a new project.
How it works 🡣
Problem:
In Forex Tester 3, you could not restart your project from a particular date without creating a new one. You could just create a new project and choose the date you need. There was no other option.
Solution:
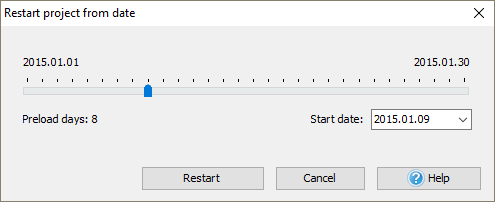
In the new version of Forex Tester, this problem has been fixed. Now you can restart your project from the selected date without creating a new project.
Location
- To restart your project from the new date, please go to the Project menu → Restart Project From Date → in the open window, choose the date you need with the help of the slider (the date you created this project is selected by default).
- After this, the information about the starting date of testing this project will be renewed.
- If you select this option, you will also receive a notification telling you that all your data will be lost.
Value:
Save your time by simply choosing another date of the project to start with - there is no need to go through creating the project wizard over and over again.
Notes and notepad
[Awesome way to keep all your thoughts in one place]
Have a trading idea and don’t want to forget it? See something interesting on a chart and want to describe it?
Now you can simply add a note to any event on a chart and then navigate between your notes in a timely fashion.
How it works 🡣
Problem:
Users of the Forex Tester 3 program had no possibility to write notes, keep them all together, and attach them right to the charts which would help to analyze the trade better.
Solution:
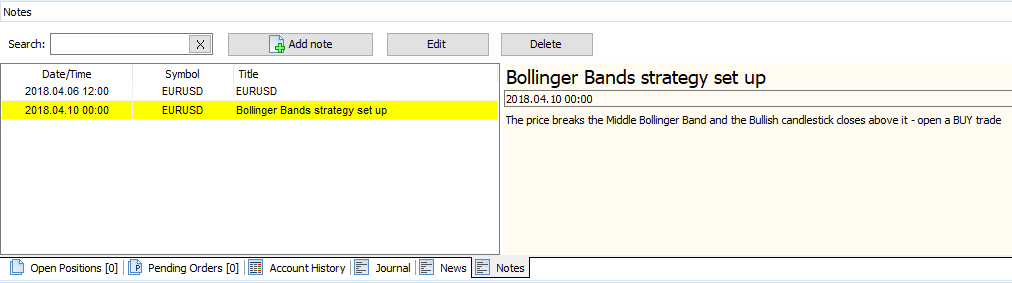
In Forex Tester 4, you can use the Notes tab for this purpose! After clicking on this tab, you will see a window divided into 2 blocks:
- In the first block, all your notes are saved in chronological order. You can see the date/time, symbol, and title of every note in the corresponding columns. Right above the list of your notes, there are actions you can perform them - Add a note, Edit, Delete, Search notes.
*Please pay attention that you can search notes only by their names, not their texts. - A second block is a place where all the notes are created. Here you can see the name of your note, its text, and the date of the candle this note is related to.
Location
The Notes tab is located next to the Journal tab on the lowest panel under the chart. In this tab, you can create, edit, delete, and search your notes.
Besides this tab, there are some other ways of adding a note:
- Go to the toolbar create a note by clicking the Note sign (next to the Text label sign) with the help of the crosshair pointer.
- Go to the “Insert” menu choose the “Note” option.
When you create a note, it becomes automatically attached to the chart of that currency pair you have selected when creating a project.
To edit a note, please choose one of these options:
- Click “Edit” in the “Notes” tab.
- Right-click on the note in the list of all your notes in the “Notes” tab.
- Right-click on the note sign on the chart.
When double-clicking on the note in the “Notes” tab, your chart will be scrolled right to this note. The note itself will be marked with the line.
To enable/disable representation of your notes on the chart, just right-click on the chart → check/uncheck the “Show Notes” option.
Value:
All your interesting ideas and trading decisions are always at your fingertips!
Which features of FT4 do you find the most useful?
Created with QuizMaker