Data Center serves as the manager of historical quotes. Here you can:
- Add/delete currency symbols.
- Look through / edit the properties of the currency symbols.
- Download minute historical data from the server.
- Import historical data from files.
- Download tick data from the server.
- Group the currency pairs and change settings for multiple pairs at the same time.
- Export data into CSV files.
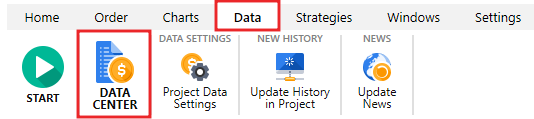
You can open the Data Center dialog window by clicking the corresponding button on the Data tab.
The Data Сenter window looks like this:

The upper indicator (the one that is green on the screenshot) shows the imported 1-minute data quality.
You can download free Forexite medium-quality data directly from the Data center in Forex Tester or our Data Sources page.
If you want to get the most accurate results, you can purchase paid data at an affordable price.
Please note that using the lower quality data will most likely lead to less accurate test results, which, in turn, may adversely affect the subsequent results of trading on live accounts in case if you choose to use your backtested trading system on the real market.
The lower indicator (the gray one with oblique lines on the screenshot) indicates the absence of tick data in this example. Tick data is crucial for testing short-term and scalping strategies.
If you are trading on M1-M30 timeframes, then subscribing to the paid historical data will be a good investment.
Please look at the description of the main elements below.
1) The list of currency symbols
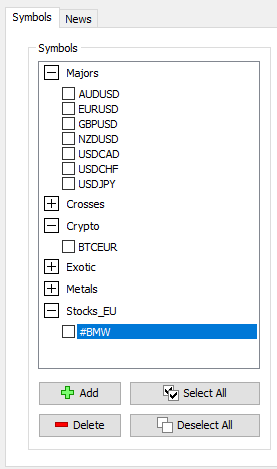
With this list, you can do the following:
- Select the currency symbols for further work. After selection, the detailed information and available actions are displayed on the right.
- Delete the symbol(s). By clicking the “Delete” button under the list, all selected symbols will be deleted.
- Add a symbol using the “Add” button under the list.
- Select or deselect all symbols of the list by applying the group settings. For example, you can select all symbols of the list and download historical data for all symbols at once.
You can also activate the multiple pairs by checking the box to the left of each currency pair and apply group settings (download data, change leverage, etc.) for them.
2) The description of currency symbol properties
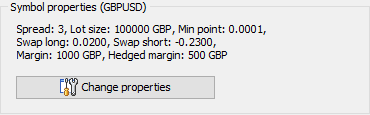
You can change currency symbol properties by clicking the “Change Properties” button.
In the Symbol properties dialog window, you can see the Common and Commissions tabs.
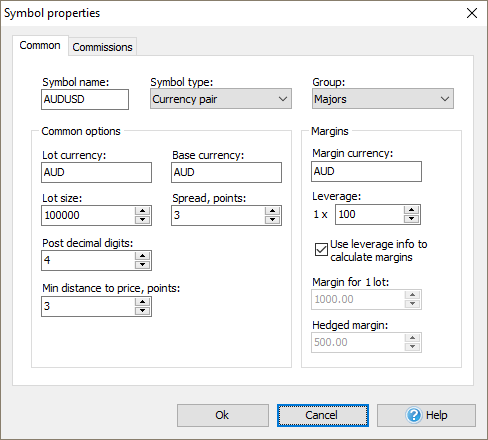
The Common tab allows you to change the following settings:
- Symbol name.
- Symbol type (currency pair, stock, index, or futures).
- Group — a group of the symbols list which the symbol refers to.
- Lot currency.
- Base currency.
- Lot size — the cost of 1 lot in the currency of the lot.
- Leverage — the ratio between the Lot size and Margin for 1 lot. Each broker uses different leverage, so we recommend using your broker’s leverage.
- Post decimal digits — the number of digits after the point. For example, 1.2500 is a 4–digit value, and 1.25001 is a 5–digit value.
- Spread, points — the spread in points.
- Min distance to price — a minimal distance to the current price in points where you can place pending orders. It defines two options:
- A minimal distance from the current market price where you can place pending orders. If you set it at 20 points and try to place a pending order 15 points above/below the current price, you will see a message indicating that the open price is too close.
- A minimal distance of SL/TP levels. If you set it at 20 points, you won’t be able to set SL/TP levels less than 20 points.
When defining Stop Loss, check it to be equal or bigger than “Min distance to price”+”Spread” value, to ensure the order is placed without any problems.
- Margin currency.
- Margin for 1 lot.
- Hedged margin — the margin that will be calculated for hedged positions for 1 lot.
You need to disable the Use leverage info option if you want to enter the margin values manually.
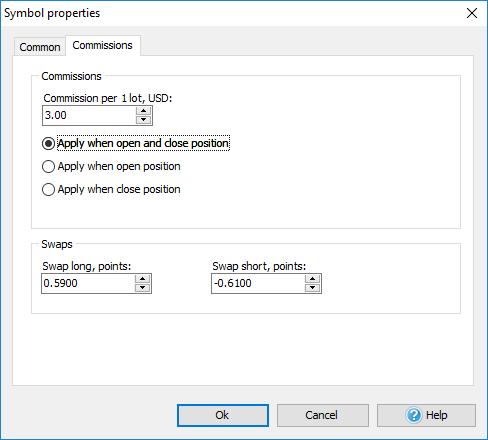
On the Commissions tab, you can set up the next properties:
Commission per lot, USD — the brokers’ commission when open and/or close positions. Here you can choose when commission should be applied during testing: when open and close position, only when you open/close the order.
Please note that when you close the position partially, the commission will also be calculated for the part of the position you want to close. The amount of the commission will be displayed in the Account History tab at the bottom of the screen after the position’s close.
- Swap long — the swap for a long position in points.
- Swap short — the swap for a short position in points.
After you change the necessary options, please click the “Ok” button.
3) Information about downloaded data
The following dialog allows getting the information about downloaded data and changing some importing properties.
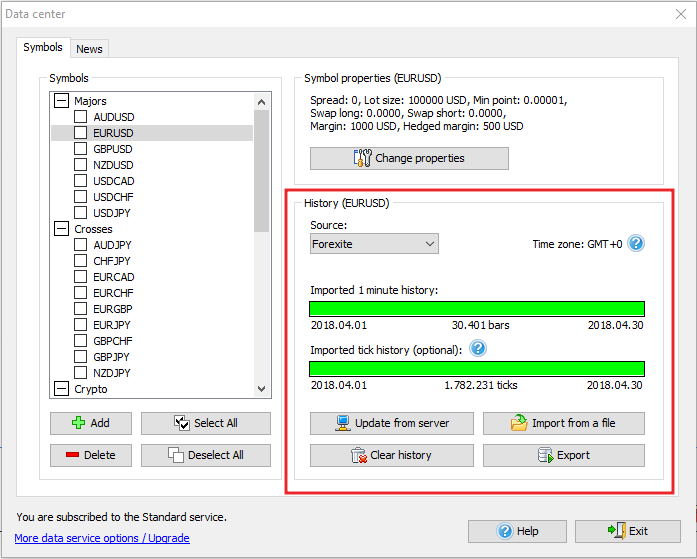
You can see the elements of this dialog in detail below:
-
Timeshift
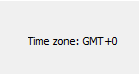
This message shows the time zone of historical data. By default, our data is provided in GMT+0 time zone.
You can change the time zone when creating a new project.
-
Data quality indicators
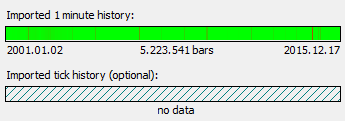
This part of the window shows the quality of historical data:
- Green areas display quality data without any gaps.
- Red areas mean missing data.
- Darkened parts indicate the presence of small blanks.
- Oblique lines show that no data has been downloaded.
-
Data management buttons
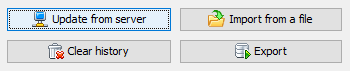
Using these buttons, you can perform the following actions:
- The “Update from server” button allows you to download historical data from our server. Look for more information about downloading the data.
- The “Import data from a file” button allows importing historical data from other sources. Files can have .txt, .csv or .hst extension. Look for more information about importing data from a file.
- The “Export” button allows exporting historical data from the Forex Tester program into a text file for further processing by another application (for example, Excel). You can export data with any timeframe from Forex Tester.
- The “Clear History” button allows you to delete historical data for selected currency symbol(s). By clicking this button, you can delete minute or/and tick history.
-
Information line
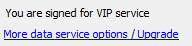
This part is located at the bottom left corner of the Data Center window. The information line displays the connection state to the data server. When the message “Connecting to the data server” appears, we do not recommend doing any actions with data at this time.
Also, the type of Data Subscription you are subscribed to is shown in the information line. Look for more info about the types of data subscriptions and subscribe here.
-
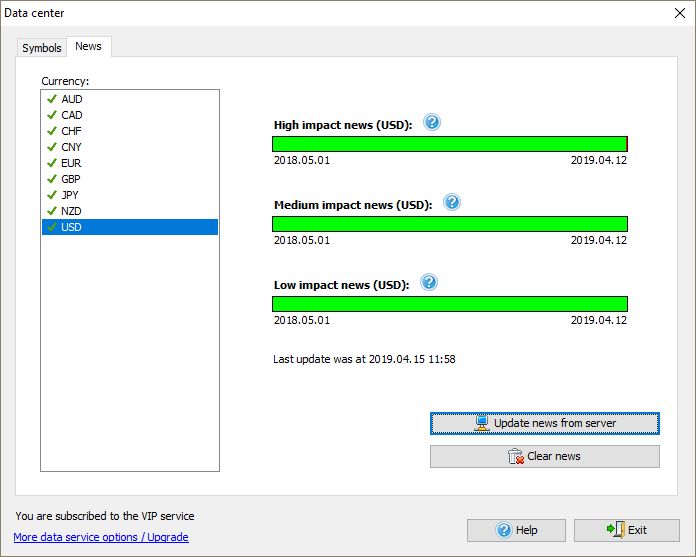
The News tab
On this tab, you can find the information about available historical news, download them manually or find the link for upgrading your subscription.
Learn more about News.